Table of Contents
Introduction
The goal of this project was to learn rust by making a simple raycasting implementation and compiling it to web assembly.
Raycasting
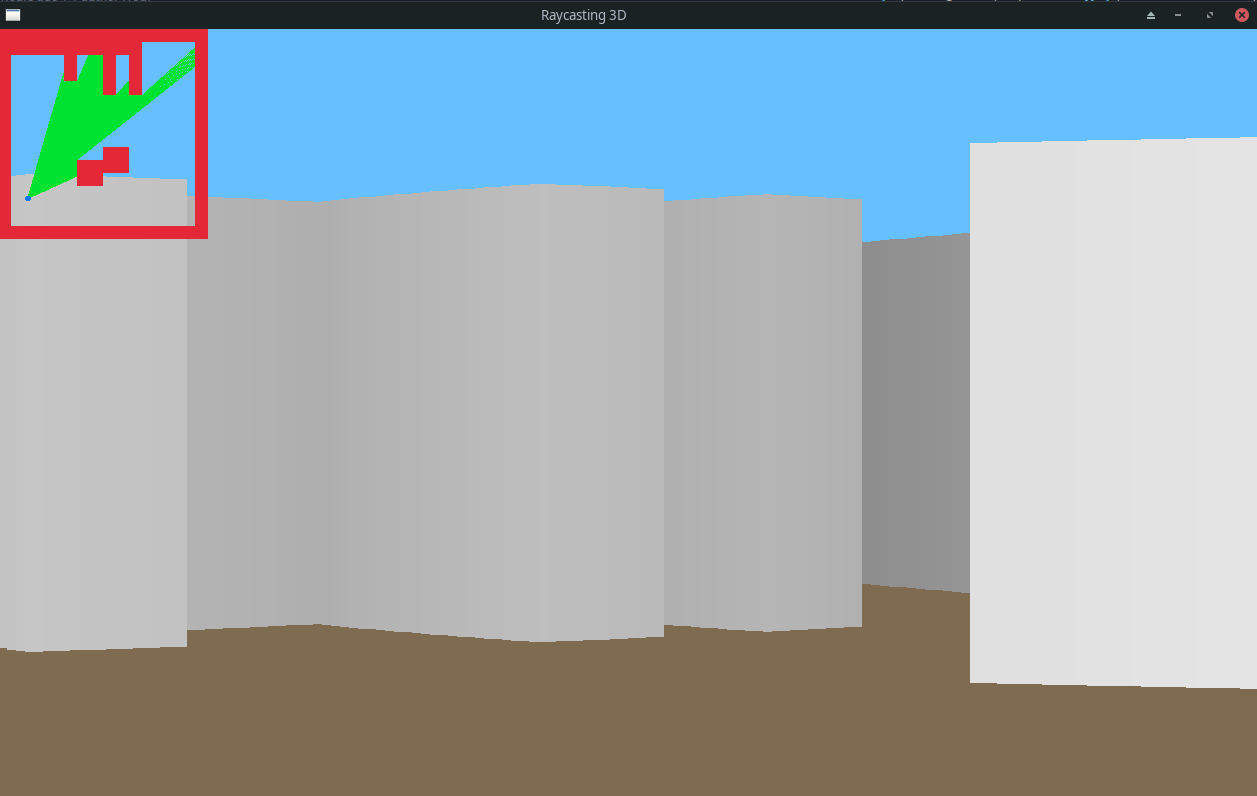
Raycasting is a rendering technique to create a 3D view in a 2D window. We can fake this perspective by drawing smaller walls the furter they are from the camera. Drawing walls with a darker color also helps to fake the perspective.
To make raycasting work, you need to send some “rays” until you hit a wall in your map. You then need to calculate the distance between the player (camera) and the wall.
Program
Format of the map
The scene is designed by the user in a text file. An exemple of the file can be seen below. There a three arguments at the beginning of the file. The first two are the width and the height, and the last one is the fov of the player. The map is built of 0’s and 1’s and the initital player position is the 2. The 1’s represents the walls.
16,16,50
1111111111111111
1111111111100001
1000010010100001
1000010010100001
1000000010100001
1000000000000001
1000020000000001
1000000000000001
1000000000000001
1000000011000001
1000001111000001
1000001100000001
1000000000000001
1000000000000001
1000000000000001
1111111111111111
Finding the walls
To find a wall, you need to send a ray in a certain direction until it hits a wall. To do that, you need to calculate the x and y increments for the ray. Once this is done, you can increment the position of the ray, until it is on a wall. You then need to calculate the distance between the player and the wall with pythagore.
To find the x and y increments, you only need to know the angle at which the ray is shot. You can then use the sine of the angle to get the y increment and the cosine of the angle to get the x increment.

In rust the function I made to get the increments is the following :
pub fn get_incr_for_angle(angle: f32) -> (f32, f32)
{
	let incr_x = angle.to_radians().cos();
	let incr_y = angle.to_radians().sin();

	return (incr_x, incr_y);
}
You can then keep incrementing the position of the ray until it hits a wall. It is important to divide the increment because if it’s too big you might jump over a corner of a wall that should’ve been it.
Once the wall is found, I add it to a list of walls. The list will be use once we are ready to draw the final render.
let mut x = map.player.x;
let mut y = map.player.y;

while get_val_at_pos(&map, y as i32, x as i32) != 1 {
	x += incr.0 / 64.0;
	y += incr.1 / 64.0;
}

walls.append(&mut vec![(x, y)]);
NOTE
Dividing or multiplying by a power of two is always better for optimisation.
Drawing the walls
Now that you have all the walls you need to draw them. The way you want to draw them is totally based on preference. I chose to make my walls grey, and I also chose to make them at least 50 pixels high. In my code, I set the height of the wall to be 80% of the screen height when the distance is 0. When the distance increases, I decrease the height of the wall. This snippet of code is how I draw the whole screen.
for wall in walls.iter().enumerate()
{
	let wall_nb = wall.0 as f32;
	let dist_x = (wall.1.0 - map.player.x).abs();
	let dist_y = (wall.1.1 - map.player.y).abs();

	// Get the distance between the player and the wall and fix the distortion
	let angle = wall_nb as f32 / ANGLE_RESOLUTION as f32 - map.player.fov as f32/2.0;
	let distortion = angle.to_radians().cos().abs();
	let total_dist = dist_x.hypot(dist_y) * distortion;

	let mut wall_size = (screen_height() * 0.80) - total_dist * 16.0;

	if wall_size < 50.0 {wall_size = 50.0;}

	// Divide the distance by the max distance to get a value between 0 and 1
	let wall_color = Color {
		r: wall_size / (screen_height() * 0.8),
		g: wall_size / (screen_height() * 0.8),
		b: wall_size / (screen_height() * 0.8),
		a: 255.0,
	};

	draw_rectangle(wall_nb * rect_size, screen_height()/2.0 - (wall_size/2.0), rect_size as f32, wall_size, wall_color);
}
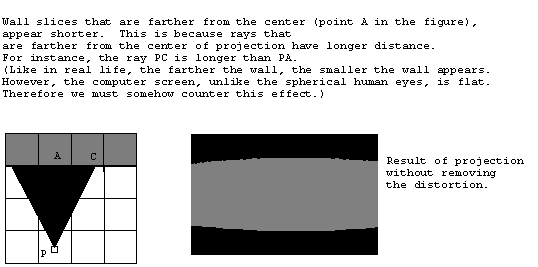
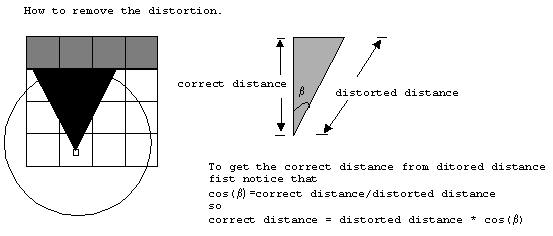
As you can see there is a distortion variable that multiplies the distance between the player and the wall. This is here to fix the fisheye effect that can be cause by the way the distance is calculated.
These two images taken from this guide can help you understand distortion.
Compiling to Web Assembly
With macroquad, compiling to web assembly is as easy as adding a target and compiling like any other project. The target you need to add is : wasm23-unknown-unknown.
rustup target add wasm32-unknown-unknown
cargo build --target wasm32-unknown-unknown
You then need to use a template html file that you can find in the README of the macroquad repository.
You can then start a web server and test you raycasting !
To make my life easier, I made a small script that compiles the raycasting and runs the webserver.
echo "Building for web assembly"
cargo build --target wasm32-unknown-unknown --release
cp target/wasm32-unknown-unknown/release/raycasting.wasm dist/raycasting.wasm
cd dist
echo "Starting web server at 127.0.0.1:8000"
python -m http.server --bind 127.0.0.1